
I recently had to investigate dual-paraboloid reflections at work for an unnamed console. What are these you ask? Great question! :) Lets start with some background.
The standard way of calculating reflections is to use an environment map, more specifically a cube map. In my last tutorial on reflections, this basic type of reflection mapping was used to compare against billboard impostor reflections. Now, cubemaps are great for static scenes, and are relatively low cost to perform a texture fetch on in a shader. However if you have a dynamic scene you have to update all 6 sides of the cubemap (this is not technically true, aggressive culling and other optimizations can guarantee at most 5 sides). Holy crap, now we have to render our scene 6 times!
This is where dual-paraboloid reflections come in. They are a view-independent method of rendering reflections just like cubemaps. Except you only have to update 2 textures, not 6! The downside is that you are going to lose quality for speed, but unless you have to have high-quality reflections, paraboloid reflections will probably provide sufficient results.
Reference articles:
View-Independent Environment Maps
Shadow Mapping for Hemispherical and Omnidirectional Light Sources
Dual Paraboloid Mapping in the Vertex Shader
In the interest of keeping this post from getting too long, I won't go into great detail on the mathematical process. I suggest you refer to the first and third papers for an in-depth discussion on the details.
Now lets move on to what exactly paraboloid mapping is. Lets look at what a paraboloid is.
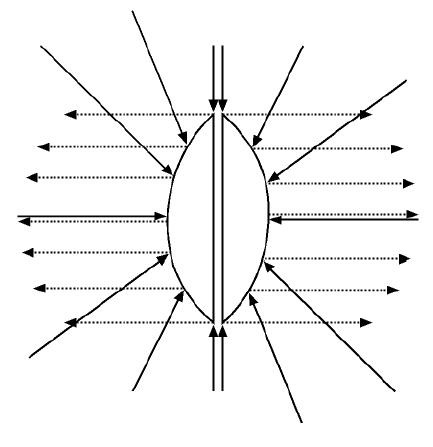
The basic idea is that for any origin O, we can divide the scene into two hemispheres, front and rear. For each of these hemispheres there exists a paraboloid surface that will focus any ray traveling in the direction of O into the direction of the the hemisphere. Here is a 2d picture demonstrating the idea:
A brief math overview:
What we need to find is the intersection point where the incident ray intersects the paraboloid surface. To do this we need to know the incident ray and the reflected ray. Now because the paraboloid reflects rays in the same direction, it is easy to compute the reflection vector: it's the forward direction of the hemisphere! So the front hemisphere's reflection vector will always be <0, 0, 1> and the rear hemisphere's reflection vector will always be <0, 0, -1>. Easy! And the incident ray is calculated the same as with environment mapping by reflecting the ray from the pixel position to the eye across the normal of the 3D pixel.
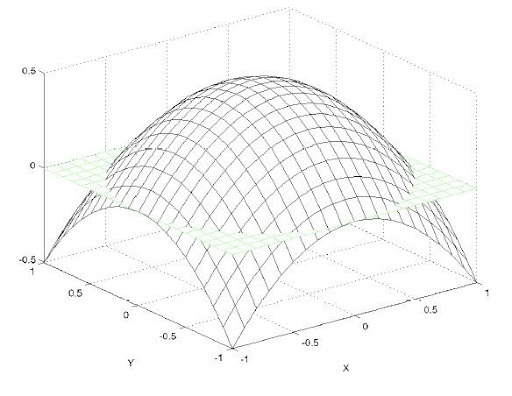
Now all we have to do is find the normal of the intersection which we will use to map our vertices into paraboloid space. To find the normal, we add the incident and reflected vectors and divide the x and y components by the z value.
Generating the Paraboloid maps:
What we are basically going to do is, in the vertex shader, place each vertex ourselves that has been distorted by the paraboloid. First we need to transform the vertex by the view matrix of the paraboloid 'camera'. We don't apply the projection matrix since we're going to place the point ourselves
output.Position = mul(input.Position, WorldViewProj);Next we need to find the vector from the the vertex to the origin of the paraboloid, which is simply:
float L = length( output.Position.xyz );output.Position = output.Position / L;
Now we need to find the x and y coordinates of the point where the incident ray intersects the paraboloid surface.
output.Position.z = output.Position.z + 1;output.Position.x = output.Position.x / output.Position.z;
output.Position.y = output.Position.y / output.Position.z;
Finally we set the z value as the distance from the vertex to the origin of the paraboloid, scaled and biased by the near and far planes of the paraboloid 'camera'.
output.Position.z = (L - NearPlane) / (FarPlane - NearPlane);
output.Position.w = 1;
And the only thing we need to add in the pixel shader is to make sure and clip vertices that are behind the viewpoint using the intrinsic clip() function of HLSL.

Reflections with paraboloid maps:
In the reflection pixel shader we will: generate the reflection vector the same way as cube mapping, generate texture coordinates for both the front and rear paraboloids' textures, and blend the samples taken from the textures.
The texture coordinates are generated exactly as how we generated them before in the generation step. We also scale and bias them to correctly index a D3D texture. And then we take a sample from each map and pick the sample with the greater color value:
// calculate the front paraboloid map texture coordinates
float2 front;
front.x = R.x / (R.z + 1);
front.y = R.y / (R.z + 1);
front.x = .5f * front.x + .5f; //bias and scale to correctly sample a d3d texture
front.y = -.5f * front.y + .5f;

// calculate the back paraboloid map texture coordinates
float2 back;
back.x = R.x / (1 - R.z);
back.y = R.y / (1 - R.z);
back.x = .5f * back.x + .5f; //bias and scale to correctly sample a d3d texture
back.y = -.5f * back.y + .5f;

float4 forward = tex2D( FrontTex, front );    // sample the front paraboloid map
float4 backward = tex2D( BackTex, back );    // sample the back paraboloid map

float4 finalColor = max(forward, backward);
Optimizations:
If you align the paraboloid 'camera' such that it is always facing down the +/- z axis, you don't need to transform the vertices by the view matrix of the camera. You only need to do a simple translation of the vertex by the camera position.
Conclusion:
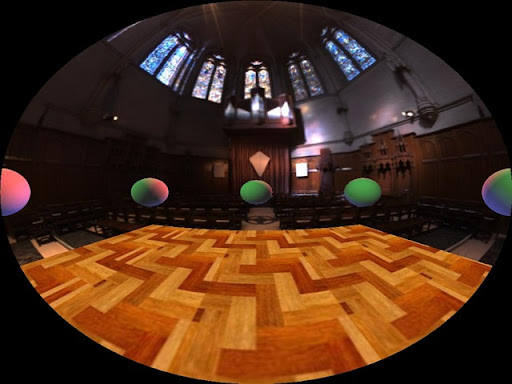
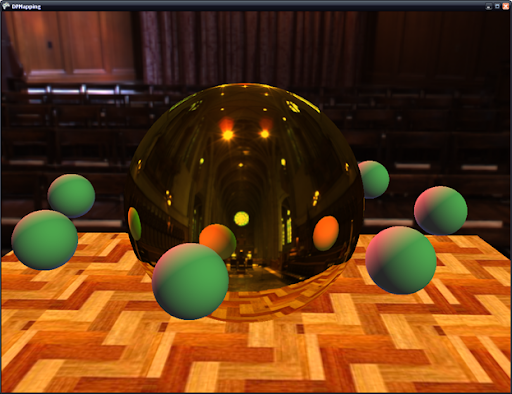
As you can see, paraboloid maps give pretty good results. The won't give you the quality of cubemaps, but they are faster to update and require less memory. And in the console world, requiring less is almost reason enough to pick this method over cubemaps.
One drawback of paraboloid maps is that the environment geometry has to be sufficiently tessellated or will we will have noticeable artifacts on our reflector. Another drawback is that on spherical objects we will see seems. However with objects that are reasonably complex (such as the Stanford bunny or dragon) and are not simple shapes, the seams will not be as noticeable.
Next time I will present dual-paraboloid mapping for use with real-time omnidirectional shadow mapping of point lights.
38 comments:
WOW! That looks awesome, I was about to undertake a cubemap refresh method for reflection, but will give this method a go, looks like it will be much faster.
Going to download this sample now and give it a go :) Hope it works on my poop system :P
Right,
After changing the index buffer to be of type short, it worked!
Plays at about 15 FPS on this pile of crud and I get some odd stuff happening with the plan on the floor, but I think that's down to the index buffers overflowing due to them being half the size.
Looks cool though!
Hmmm... I just changed the quad to use shorts and I don't get any errors on the floor plane.
Well, even with shorts and a very small quad, it flickers like mad, like on frame draws half of it, the next, all, the next most and so on.
With the quad at the default size you had does the same, but I also get odd anomalies appearing across the screen, like part of the quad is being squished up into 2D on the scree.
Must be my poop screen. If you like I can put a clip together for you and post it??
That would be great! I wish I had below a Geforce 6 series around here.
LOL! Don't mock my Graphics Card!!!
Will get a clip up in the next 30 minutes.
Lol I'm not. I was being semi-serious. Ever since I've been doing graphics programming I've had at least a 6 series. So I don't know what to look out for on non ps 3.0 cards.
Kyle,
Here it is:
http://uk.youtube.com/watch?v=-IjFc_H8LMw
read my notes in the more info.
Let me know when you have had a look and I will delete it.
First, the width and height should be a power of 2 + 1 (like 33, 65, 129). That might explain the problems with first one.
I'm not sure why 65 is messing up...
How did you create the terrain that you posted awhile back for the hm engine? I'm guessing you were able to have at least a 65 vertex wide grid?
yes, 128 x 128 I think should be up to short.MaxValue I guess...
Nope, no joy with a ^2 ether, same flicker... oh well, on to the shadow effect now then lol...
I'll have a look at your terrain sample (or maybe you could :) ) to see the differences in how we build our grids.
Will do. I have noticed with my terrain, when it is over a certain size (forget what now, but over 128x128) I get a slight flicker at the very far edge, as if it is just not drawing it all in time.
Will have a look though.
I had a look at your terrain and the only thing that seemed to be different is the way we build our grids. Mine is built in rows and yours is built in columns.
I found a dirty way to get rid of any seams between the two maps, just use:
output.Position.z = output.Position.z + 0.99;
It projects the parabaloid (a very tiny bit) bigger, covering up the problem causing areas on the edges.
Also I rewrote the reflection part in a slightly more vector optimized fashion (Shaves off 3 instructions on PS 3.0):
float zFactorF = 2 * (1 + R.z);
float2 front = float2(R.x, -R.y);
front /= zFactorF;
front += float2(0.5, 0.5);
float zFactorB = 2 * (1 - R.z);
float2 back = float2(R.x, -R.y);
back /= zFactorB;
back += float2(0.5, 0.5);
Great post Kyle!
While cube maps might be more popular there are great looking games that use this method to compute reflections, see GT3 an GT4 on PS2 (that doesn't support cube maps).
Keep up the good work :)
Marco
Thanks for the comment Marco! Looking forward to your next post :)
Thanks so much for posting this. Even though I don't even pretend to understand the mathematical principles or even the code behind it, I at least know how it works from a practical perspective.
Quick question though - would it be feasible to get Dual Paraboloid reflections running in a fairly typical real-time 3D engine on a modern games console? I'm doing a bit of research for a future game project and I heard this mentioned in conjunction with Grand Theft Auto 4, which has some impressive realtime reflections, and thought it may be worth checking out.
Anyway, great article. Thanks again.
Laurence
It's not too complicated to integrate dual-paraboloid reflections into an engine/framework. Like you said, I believe GTA4 used DP reflections.
The main issue is correctly handling the seam where the two maps meet. Especially noticeable on simple objects (spheres, cubes, planes, etc..).
Ok great, cheers for the info. And thanks again for the write-up.
Hi,
Awesome method. I just wonder can the same thing applies for refraction as well? In the blog you mention it is not as good as cube-mapping, so I wonder how is it done using cube-mapping? Thanks.
Absolutely this method can be used for refractions. I haven't used dpm for reflections, but the only thing that should be different is calculating the refraction vector vs. the reflection vector.
Instead of calculating the reflection vector, you would instead calculate the refraction vector (this can be done using the refract() function of HLSL/Cg). And then everything else should be the same.
In cube mapping, for reflections or refractions, the scene is rendered 6 different times into a cube map with the camera pointing down the +-X/Y/Z axes. Note, there are possible optimizations for rendering cube maps that ensure that all 6 faces don't need to be updated each frame. Sometimes 1 or 2 only need to be updated.
Then in the shader the reflection/refraction vectors are used to index the cube map with the texCUBE() texture function to find the reflected or refracted color.
Hi Kyle,
Thank your for replying. I will try this method out with both reflection and refraction. Please visit my blog at http://thangnguyendemo.blogspot.com/ and tell me what you think :D.
I will also look into cube mapping method. Do you know any good sample using this method?
Not off the top of my head. I'm sure a google search could find you one.
Hi Kyle,
Just an out of topic question but how do you create the box around your code like that ? I really want to do it but I don't see that feature in blog writing. My best guess it has something to do with HTML. If you can show me I would greatly appreciate. Thanks.
I made my own style and stuck it into the blog template:
.mycode
{
border-left: rgb(153,153,153) 1pt dashed;
border-top: rgb(153,153,153) 1pt dashed;
border-right: rgb(153,153,153) 1pt dashed;
border-bottom: rgb(153,153,153) 1pt dashed;
padding-right: 5pt;
padding-left: 5pt;
padding-top: 5pt;
padding-bottom: 5pt;
min-height: 250pt;
max-height: 500pt;
overflow: auto;
word-wrap: normal;
}
And this is what a code block looks like:
<pre class="mycode">
...code...
</pre>
And to get the fancy syntax highlighting I use a paste from visual studio plugin for Windows Live Writer, which is what I use to publish all my posts; which I learned of from RandomChaos
Hi Kyle,
Thank you for showing me that. I just wonder where do I have to put the .mycode block ? Is that in the Edit Html of the edit posts? It would be great if you can show me a picture of where it is. Sorry to bother you and thank you so much for your help.
Yes. Click on Edit Template and then insert the style in the same area as the other styles are. These are the ".[NameOfStyle]" blocks in the template.
Hi Kyle,
I'm sorry but in the Edit Template I put the block .mycode under
/* ---( main column )--- */
I don't know if that's the right area. So in the post html I put
< pre class="mycode" >
testing
< /pre >
But all it shows is just
testing
and it doesn't have the box surround the "testing" like yours. It would be great if you can send me your template html and post html as an example so I can have a look at it and figure it out for myself. My e-mail is b_thangvn@yahoo.com. Thank you so much.
Did you actually publish the post after pasting the style in the html template? It won't show up in preview mode, only after you've published it.
Hi Kyle,
You are right :p. Sorry so much for bother you and thank you so much for helping me out.
About Window Live Writer, so you say we can use it to publish post on Blogger ?
No problem. And yes, you can use Windows Live Writer to publish to blogger (and many other blog sites).
Hi Kyle,
Just want to let you know I just finished implementing dynamic cube mapping. Visit my blog later if you have time.
Just one question: how do you put a Youtube video in your post? Thanks.
Just copy and paste the embed link.
Thank you for this article.
I've used it with the gamedev one to achieve to produce those dual paraboloid maps and reflexion effect. I'll now move to VSM paraboloid shadow mapping which was my initial goal.
Cool. Just played around with your app - it's very useful.
Have you tried using a small RTT (eg. 32x32) and then running a blur on it?
You could get an AO approximation?
Chris
Thanks a lot for this post. Implemented this in unity in no-time :)
Hi Waldo, I just did the same but failing with the skybox, how did you manage that? :D Details of what works for me and what doesn't when copying this technique over to Unity: http://forum.unity3d.com/threads/so-i-got-dual-paraboloid-97-working-would-you-gurus-co-brainstorm-with-me-for-the-last-3.253448/
Post a Comment