Human Head has been keeping me busy since I've been working there and I can finally say why: Prey 2. The game was announced on Monday :) Here's the Prey 2 teaser trailer:
http://www.g4tv.com/videos/51782/Prey-2-Debut-Trailer---Exclusive-Premiere/
Tuesday, March 15, 2011


Tuesday, August 3, 2010
Animating Water Using Flow Maps

Last week I attended SIGGRAPH 2010, and among the many good presentations, Valve game a talk on the simple water shader they implemented for Left For Dead 2 and Portal 2. So on the plane ride back from LA, I whipped up this little sample from what I could remember of the talk. Edit: You can find the talk here: http://advances.realtimerendering.com/s2010/index.html
The standard technique for animated water is scrolling normal maps, as I’ve previously written about. The problem with this is that it looks unnatural as water does not uniformly move in one direction. So Valve came up with the idea of using flow maps ( based on a flow viz paper from the mid 90s ). The basic idea of flow maps is that you create a 2D texture that you will map to your water. And this map will contain the flow directions that you want the water to flow, with each pixel in the flow map representing a flow vector. This allows you to have varying velocity ( based on length of the flow vector ), and varying flow directions ( based on the color of the flow vector ). You then use this flow map to alter the texture coordinates of the normal maps instead of scrolling them. Lets get to work :)
The Flow Map
First we need to create a flow map. Here’s what I came up with in a couple of minutes in Photoshop. This flow map was designed around the column with dragon scene as with the previous scene. Note, this flow map is greatly exaggerated to demonstrate the effect.

Using The Flow Map
Now we need to use the flow map to alter the water normal maps. We do this by taking the texture coordinate of the current water pixel and offset it using the flow vector from the flow map based on a time offset. We then render the water as we did in the previous water sample. But there’s a problem with this, after awhile the texture coordinates will become so distorted that the normal maps will be stretched and will have nasty filtering artifacts. So to solve this we limit the amount of distortion of the texture coordinates by resetting the time offset. This solves the over-distortion, but now the water will reset every X seconds. So we introduce another layer, that is offset from the first by half a time cycle. This will ensure that while one layer is fading out and beginning to reset, the next layer is fading to where the last layer was. Here’s a diagram to visualize this phase-in phase-out of the 2 layers.

The graph illustrates that during a cycle time from 0 to 1, we want the layer to be fully interpolated at the mid-point in the cycle, and fully un-interpolated at 0 and 1. Lets see the code:
//get and uncompress the flow vector for this pixel
float2 flowmap = tex2D( FlowMapS, tex0 ).rg * 2.0f - 1.0f;

float phase0 = FlowMapOffset0;
float phase1 = FlowMapOffset1;

// Sample normal map.
float3 normalT0 = tex2D(WaveMapS0, ( tex0 * TexScale ) + flowmap * phase0 );
float3 normalT1 = tex2D(WaveMapS1, ( tex0 * TexScale ) + flowmap * phase1 );

float flowLerp = ( abs( HalfCycle - FlowMapOffset0 ) / HalfCycle );
float3 offset = lerp( normalT0, normalT1, flowLerp );
In the code above, HalfCycle would be .5 if our cycle was from 0 to 1. We can see here that we unwrap the flow vector (as it is stored in [0,1] and we need it in [-1,1]), fetch the normals using the flow vector and then lerp between the two normals based on the cycle time. This however will lead to a subtle pulsing affect, which I couldn’t really notice when the water was rendered, but I included the fix for completeness. To fix this pulsing effect, we perturb the flow cycle at each pixel using a noise map.
//get and uncompress the flow vector for this pixel
float2 flowmap = tex2D( FlowMapS, tex0 ).rg * 2.0f - 1.0f;
float cycleOffset = tex2D( NoiseMapS, tex0 ).r;

float phase0 = cycleOffset * .5f + FlowMapOffset0;
float phase1 = cycleOffset * .5f + FlowMapOffset1;

// Sample normal map.
float3 normalT0 = tex2D(WaveMapS0, ( tex0 * TexScale ) + flowmap * phase0 );
float3 normalT1 = tex2D(WaveMapS1, ( tex0 * TexScale ) + flowmap * phase1 );

float flowLerp = ( abs( HalfCycle - FlowMapOffset0 ) / HalfCycle );
float3 offset = lerp( normalT0, normalT1, flowLerp );
And that’s pretty much it. I’ll update the post/source when the slides are posted from SIGGRAPH in case I left anything out. Video time!
Source/Demo: WaterFlow Demo
Thursday, May 6, 2010
Volume Rendering 202: Shadows and Translucency
Finally, here is the last sample on volume rendering. It’s only taking me a year to get around to finishing it. Is anyone even visiting this page anymore? I’d better post this for my sanity anyhow.
Last time I left you with some basic optimizations, one being a pseudo-empty space skipping. But as I noted, the volumes needed to be sorted in order for it to work completely. We sort the sub-volumes back to front with respect to distance to the camera. This insures that we have a smooth framerate no matter what angle the camera is at. A speedup we can do here is to only sort the volumes if the camera has moved 45 degrees since we last sorted.
So now our subvolumes are sorted w.r.t. the camera. But we have alpha blending artifacts because depending on the view, the pixels of the subvolumes are not drawn in the correct order. What we can do to fix this is to draw a depth only pass, and ensure that we only draw pixels that will contribute to the final image.

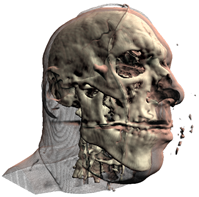
Left: no depth prepass. Right: depth prepass
Translucency
The first sample includes an approximated translucency. It is far from realistic, but it gives fairly good results. The idea is very similar to depth mapping, compare the current pixels depth to that of the depth map, and either use this value to look up into a texture or perform an exponential falloff in the shader (the sample does the latter).

Shadows
There isn’t much to say here. The sample below uses variance shadow mapping.
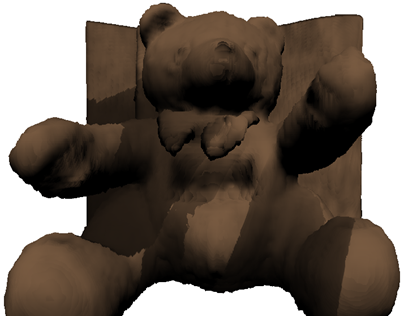

Well, there it is. Anticlimactic wasn't it?
Last time I left you with some basic optimizations, one being a pseudo-empty space skipping. But as I noted, the volumes needed to be sorted in order for it to work completely. We sort the sub-volumes back to front with respect to distance to the camera. This insures that we have a smooth framerate no matter what angle the camera is at. A speedup we can do here is to only sort the volumes if the camera has moved 45 degrees since we last sorted.
So now our subvolumes are sorted w.r.t. the camera. But we have alpha blending artifacts because depending on the view, the pixels of the subvolumes are not drawn in the correct order. What we can do to fix this is to draw a depth only pass, and ensure that we only draw pixels that will contribute to the final image.


Left: no depth prepass. Right: depth prepass
Translucency
The first sample includes an approximated translucency. It is far from realistic, but it gives fairly good results. The idea is very similar to depth mapping, compare the current pixels depth to that of the depth map, and either use this value to look up into a texture or perform an exponential falloff in the shader (the sample does the latter).

Shadows
There isn’t much to say here. The sample below uses variance shadow mapping.


Well, there it is. Anticlimactic wasn't it?
Wednesday, May 5, 2010
Ground control to Major Tom
Wow, it’s been over a year since the last post on volume rendering! I must sound like a broken record. Anyhow, I’ve had time to fix a couple of bugs with the last installment in the past couple of weeks and it should be coming online pretty soon.
So why have I been absent lately? Last spring I was recruited to work on American Sign Language teaching software for Purdue University. The project ranged from database implementation, to layered skeletal animation with additive blending support and facial animation, to creating a language and compiler for ASL scripts (Antlr was amazing for this). Also, our paper was accepted at SIGGRAPH in the Education section.
On top of that I accepted a job at Human Head Interactive in January as a tech programmer ( these ramblings actually paid off :) ). I’m really excited to be working with some smart and talented people. We have some cool rendering tech – thanks to our lead graphics programmer – and pretty slick game play ideas.
Also, sorry to anyone who has commented on a post and it hasn't been posted, I've been spammed by bots for awhile now.
Saturday, April 10, 2010
Water for your monies?
I got an email a couple of weeks ago from someone ( Maximinus ) who actually put the water shader from the water game component to good use. Here's a description of the game on the xbox indie marketplace:
Missile Escape for Xbox Indies is simple : go flying, evade many
missiles and unlock new fighters along the way ! Warning : Fighter
pilot spirit required.
Missile Escape for Xbox Indies is simple : go flying, evade many
missiles and unlock new fighters along the way ! Warning : Fighter
pilot spirit required.
Thursday, August 27, 2009
Particle Spectrum Animation
Really cool video I found last night. Uses Particular and Adobe After Effects.
Thursday, July 30, 2009
Water in Your Browser
Recently I’ve been playing around with O3D. If you don’t know, O3D is Google’s new browser graphics API. It enables you to develop 3d interactive applications that run inside a browser window (and quite easily mind you). In fact it rivals XNA on getting an app up and running quickly.
And on that note, I’ve ported the water sample to O3D (minus the camera animation). Besides a bug I encountered with the sample content converter (and promptly fixed by one of the o3d developers), it was a relatively painless conversion. All that was required was to setup a scene in max, apply materials, export to collada and convert to the o3d format. Setting up the render targets also took minimal effort :). The shaders, for the most part, remained untouched.
Click the picture to have a go!

If you’re interested in the max file or source you can get both here:
Friday, June 19, 2009
Non-photorealistic SSGI
I recently got back from my vacation to the Mediterranean and finally have had time to post this video.
For one of my final projects last semester I implemented a deferred renderer with SSAO and simplified global illumination (SSGI). But I wanted to have a dream-like result, so I over emphasized the color bleeding and used the light accumulation buffer plus emissive color of objects; and lots of blurring. The result looks pretty neat I think, not at all accurate lighting but cool none the less. This one was done in C++/DirectX instead of the usual XNA fare.
Large HD video on youtube
For one of my final projects last semester I implemented a deferred renderer with SSAO and simplified global illumination (SSGI). But I wanted to have a dream-like result, so I over emphasized the color bleeding and used the light accumulation buffer plus emissive color of objects; and lots of blurring. The result looks pretty neat I think, not at all accurate lighting but cool none the less. This one was done in C++/DirectX instead of the usual XNA fare.
Large HD video on youtube
Thursday, April 23, 2009
Volume Rendering Update, DirectX blog
Wow, I can't believe it's almost May already. I also can't believe my last post was back in February! I've had the next installment in the volume rendering series basically done since January. I just have to put some finishing touches on it and write the post. I've just been very busy finishing my last semester, research, searching for a job, and considering graduate school.
I've been working on a deferred renderer and delving into screen space ambient occlusion and global illumination for one of my final projects. I'll probably post some images of the final result when it's done.
Ysaneya has a very interesting post on deferred rendering and instant radiosity.
Also, if you haven't noticed, the DirectX team has a new blog: http://blogs.msdn.com/DirectX/
I've been working on a deferred renderer and delving into screen space ambient occlusion and global illumination for one of my final projects. I'll probably post some images of the final result when it's done.
Ysaneya has a very interesting post on deferred rendering and instant radiosity.
Also, if you haven't noticed, the DirectX team has a new blog: http://blogs.msdn.com/DirectX/
Wednesday, February 4, 2009
Volume Rendering 201: Optimizations
The discussion on hand this time is optimizing the performance of the volume renderer. I’ll cover a few of these optimizations and provide a rough implementation of one of them.
Cache Efficiency and Memory Access

Picture from Real-time Volume Graphics.
Currently we load our volume data into a linear layout in memory. However, the ray that is cast through the volume is not likely to access neighboring voxels as we traverse it through the volume when the data is in a linear layout. But we can improve the cache efficiency by converting the layout to a block-based manor through swizzling. With the data in a block format, the GPU is more likely to cache neighboring voxels as we walk through the volume, which will lead to an increase in memory performance.
Empty-Space Leaping
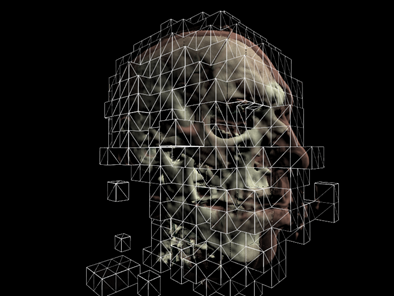
In the previous samples we ray-casted against the entire bounding volume of the data set, even if we were just sampling samples with zero alpha along the way. But we can skip these samples all together, and only render parts of the volume that have a non-zero alpha in the transfer function. More on this in a bit.
Occlusion Culling
If we render the volume in a block-based fashion as above, and sort the blocks from front to back, we can use occlusion queries to determine which blocks are completely occluded by blocks in front of them. There are quite a few tutorials on occlusion queries on the net, including this one at ziggyware.
Deferred Shading
We can also boost performance by deferring the shading calculations. Instead shading every voxel during the ray-casting, we can just output the depth and color information into off-screen buffers. Then we render a full-screen quad and use the depth information to calculate normals in screen space and then continue to calculate the shading. Calculating normals this way also has the advantage of being smoother and have less artifacts that computing the gradients of the volume and storing them in a 3D texture. We also save memory this way since we don’t have to save the normals, only the isovalues in the 3D texture.
Image Downscaling
If the data we are rendering is low frequency (e.g. volumetric fog), we can render the volume into an off-screen buffer that is half the size of the window. Then we can up-scale this image during a final pass. This method is also included in the sample.
Implementing Empty-Space Leaping
To implement empty-space leaping we need to subdivide the volume into smaller volumes and we also need to determine if these smaller volumes have an opacity greater than zero. To subdivide the volume we follow an approach very similar to quadtree or octree construction. We start out with an original volume from [0, 0, 0] to [1, 1, 1]. The volume is then recursively subdivided until the volume width is say .1 (so we basically divide the volume along each dimension by 10). Here’s how we do that:
Problems
Now, a problem that this method introduces is overdraw. You can see the effects of this when rotating the camera to view the back of the bear; here the frame rate drops considerably. To remedy this the sub-volumes need to be sorted front to back by their distance to the camera each time the view changes. I’ve left this as an exercise for the reader. The new demo implements empty space leaping and downscaling. And when rendering the teddy bear volume frame rates on my 8800GT are at about 190 FPS. Compare this to the the last demo from 102 at 30 FPS. All at a resolution of 800x600. Pretty good results! Next time I’ll be introducing soft shadows and translucent materials.
References: Real-time Volume Graphics
Cache Efficiency and Memory Access

Picture from Real-time Volume Graphics.
Currently we load our volume data into a linear layout in memory. However, the ray that is cast through the volume is not likely to access neighboring voxels as we traverse it through the volume when the data is in a linear layout. But we can improve the cache efficiency by converting the layout to a block-based manor through swizzling. With the data in a block format, the GPU is more likely to cache neighboring voxels as we walk through the volume, which will lead to an increase in memory performance.
Empty-Space Leaping

In the previous samples we ray-casted against the entire bounding volume of the data set, even if we were just sampling samples with zero alpha along the way. But we can skip these samples all together, and only render parts of the volume that have a non-zero alpha in the transfer function. More on this in a bit.
Occlusion Culling
If we render the volume in a block-based fashion as above, and sort the blocks from front to back, we can use occlusion queries to determine which blocks are completely occluded by blocks in front of them. There are quite a few tutorials on occlusion queries on the net, including this one at ziggyware.
Deferred Shading
We can also boost performance by deferring the shading calculations. Instead shading every voxel during the ray-casting, we can just output the depth and color information into off-screen buffers. Then we render a full-screen quad and use the depth information to calculate normals in screen space and then continue to calculate the shading. Calculating normals this way also has the advantage of being smoother and have less artifacts that computing the gradients of the volume and storing them in a 3D texture. We also save memory this way since we don’t have to save the normals, only the isovalues in the 3D texture.
Image Downscaling
If the data we are rendering is low frequency (e.g. volumetric fog), we can render the volume into an off-screen buffer that is half the size of the window. Then we can up-scale this image during a final pass. This method is also included in the sample.
Implementing Empty-Space Leaping
To implement empty-space leaping we need to subdivide the volume into smaller volumes and we also need to determine if these smaller volumes have an opacity greater than zero. To subdivide the volume we follow an approach very similar to quadtree or octree construction. We start out with an original volume from [0, 0, 0] to [1, 1, 1]. The volume is then recursively subdivided until the volume width is say .1 (so we basically divide the volume along each dimension by 10). Here’s how we do that:
private void RecursiveVolumeBuild(Cube C)
{
     //stop when the current cube is 1/10 of the original volume
     if (C.Width <= 0.1f)
     {
          //add the min/max vertex to the list

          Vector3 min = new Vector3(C.X, C.Y, C.Z);

          Vector3 max = new Vector3(C.X + C.Width, C.Y + C.Height, C.Z + C.Depth);

          Vector3 scale = new Vector3(mWidth, mHeight, mDepth);

          //additively sample the transfer function and check if there are any

         //samples that are greater than zero

         float opacity = SampleVolume3DWithTransfer(min * scale, max * scale);

         if(opacity > 0.0f)

         {

               BoundingBox box = new BoundingBox(min, max);

               //add the corners of the bounding box

               Vector3[] corners = box.GetCorners();

               for (int i = 0; i < 8; i++)

               {

                    VertexPositionColor v;

                    v.Position = corners[i];

                    v.Color = Color.Blue;

                    mVertices.Add(v);

               }

          }

          return;
     }

     float newWidth = C.Width / 2f;
     float newHeight = C.Height / 2f;
     float newDepth = C.Depth / 2f;

     ///  SubGrid        r  c  d
     ///  Front:
     ///  Top-Left    :  0   0   0
     ///  Top-Right   :  0   1   0
     ///  Bottom-Left :  1   0   0
     ///  Bottom-Right:  1   1   0
     ///  Back:
     ///  Top-Left    :  0   0   1
     ///  Top-Right   :  0   1   1
     ///  Bottom-Left :  1   0   1
     ///  Bottom-Right:  1   1   1
     for (float r = 0; r < 2; r++)
     {
          for (float c = 0; c < 2; c++)

          {
                for (float d = 0; d < 2; d++)

                {

                     Cube cube = new Cube(C.Left + c * (newWidth),

                                          C.Top + r * (newHeight),

                                          C.Front + d * (newDepth),

                                          newWidth,

                                          newHeight,

                                          newDepth);

                                          RecursiveVolumeBuild(cube);

                }

          }
     }
}
To determine whether a sub-volume contains any samples that have opacity, we simply loop over the volume and additively sample the transfer function:
private float SampleVolume3DWithTransfer(Vector3 min, Vector3 max)
{
     float result = 0.0f;

     for (int x = (int)min.X; x <= (int)max.X; x++)
     {
          for (int y = (int)min.Y; y <= (int)max.Y; y++)

          {

               for (int z = (int)min.Z; z <= (int)max.Z; z++)

               {

                    //sample the volume to get the iso value

                    //it was stored [0, 1] so we need to scale to [0, 255]

                    int isovalue = (int)(sampleVolume(x, y, z) * 255.0f);

                    //accumulate the opacity from the transfer function

                    result += mTransferFunc[isovalue].W * 255.0f;

               }

          }

     }

     return result;
}
Depending on the transfer function (a lot of zero opacity samples), this method can increase our performance by 50%.
Problems
Now, a problem that this method introduces is overdraw. You can see the effects of this when rotating the camera to view the back of the bear; here the frame rate drops considerably. To remedy this the sub-volumes need to be sorted front to back by their distance to the camera each time the view changes. I’ve left this as an exercise for the reader. The new demo implements empty space leaping and downscaling. And when rendering the teddy bear volume frame rates on my 8800GT are at about 190 FPS. Compare this to the the last demo from 102 at 30 FPS. All at a resolution of 800x600. Pretty good results! Next time I’ll be introducing soft shadows and translucent materials.
References: Real-time Volume Graphics
Subscribe to:
Posts (Atom)