If you didn't know there's a new version of the creators site up, go check it out.
I've been pretty busy lately. This summer I have an internship with a local game developer, Gabriel Entertainment. They have me working with a Wii dev kit to help bring one of their PC games to the Wii. It's pretty cool stuff.
I'm also working on a remake of the Missile Game 3D flash game in XNA in my free time. I'll be posting the post process manager that I'm using for this project once I port it from XNA 1.0 to 2.0. So stay tuned for this. I'll probably include with this motion blur and depth-of-field post processes.
Tuesday, May 20, 2008
Saturday, May 3, 2008
Camera Animation, Part II
Camera Animation with a cubic spline:
So last time I lied a little bit about our camera path. I showed this picture:
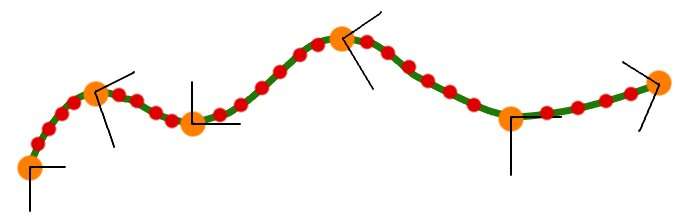
to describe the path that we wanted. But with linear interpolation, what we really ended up with was something like:
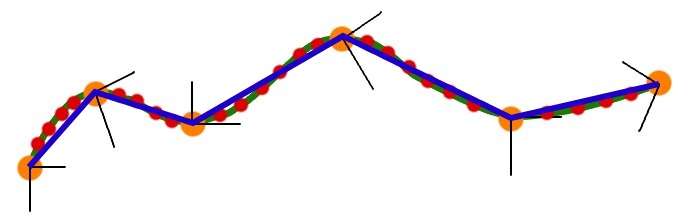
But today, I'll introduce cubic spline interpolation, and this will produce a truly smooth curve. Most of the code is the same, the only thing that has changed is that I have added a cubic option to the build function and have changed the animation to be reliant on time.
Building the natural cubic spline is more math intensive than with linear interpolation, so to start out here's a few links on cubic splines:
This is what the calculateCubicSpline function does, it builds polynomials for each control point, successively building off of the last control point's polynomial. Let's look at it:
So last time I lied a little bit about our camera path. I showed this picture:
to describe the path that we wanted. But with linear interpolation, what we really ended up with was something like:
But today, I'll introduce cubic spline interpolation, and this will produce a truly smooth curve. Most of the code is the same, the only thing that has changed is that I have added a cubic option to the build function and have changed the animation to be reliant on time.
Building the natural cubic spline is more math intensive than with linear interpolation, so to start out here's a few links on cubic splines:
- http://mathworld.wolfram.com/CubicSpline.html
- http://www.physics.utah.edu/~detar/phycs6720/handouts/cubic_spline/cubic_spline/node1.html
- http://www.cse.unsw.edu.au/~lambert/splines/
- An Introduction to Splines for Use in Computer Graphics and Geometric Modelling
//a point on a cubic spline is affected by every other pointSo the first thing we do is build the cubic polynomials for each control point. And because each point controls the shape of the spline, we have to consider each point when building the polynomials. In this way, it is very different from linear interpolation in that we have to know information about the whole curve to perform a cubic interpolation rather than just the current and next control point as with linear interpolation. You might be thinking that "well Vector3 already contains a SmoothStep function that performs cubic interpolation". And you're right it does, but just interpolating the two points without knowledge of the whole curve still produces segmented(i.e. not smooth) animation. Once we have the polynomials for each control point, we can perform a cubic interpolation by just looking at the current and next control point, in the same fashion that we did with linear interpolation.
//so we need to build the cubic equations for each control point
//by looking at the entire curve. This is what calculateCubicSpline does
Vector3[] looks = new Vector3[mKeyFrames.Count];
Vector3[] positions = new Vector3[mKeyFrames.Count];
Vector3[] ups = new Vector3[mKeyFrames.Count];
for (int i = 0; i < mKeyFrames.Count; i++)
{
looks[i] = mKeyFrames[i].Look;
positions[i] = mKeyFrames[i].Position;
ups[i] = mKeyFrames[i].Up;
}
Cubic[] pos_cubic = calculateCubicSpline(mKeyFrames.Count - 1, positions);
Cubic[] look_cubic = calculateCubicSpline(mKeyFrames.Count - 1, looks);
Cubic[] up_cubic = calculateCubicSpline(mKeyFrames.Count - 1, ups);
for (int i = 0; i < mKeyFrames.Count - 1; i++)
{
for (int j = 0; j < mPathSteps; j++)
{
float k = (float)j / (float)(mPathSteps - 1);
Vector3 center = pos_cubic[i].GetPointOnSpline(k);
Vector3 up = up_cubic[i].GetPointOnSpline(k);
Vector3 look = look_cubic[i].GetPointOnSpline(k);
Vector3 r = Vector3.Cross(up, look);
Vector3 u = Vector3.Cross(look, r * -1f);
Camera cam = new Camera();
cam.SetLens(mFOV, mAspect, mNearZ, mFarZ);
cam.Place(center, look, u);
cam.BuildView();
mCameraPath.Add(cam);
}
}
This is what the calculateCubicSpline function does, it builds polynomials for each control point, successively building off of the last control point's polynomial. Let's look at it:
Vector3[] gamma = new Vector3[n + 1];Once we find the cubic equation for each control point (key frame), we can use GetPointOnSpline() uses the cubic equation to calculate the intermediate point along the cubic spline.
Vector3[] delta = new Vector3[n + 1];
Vector3[] D = new Vector3[n + 1];
int i;
/* We need to solve the equation
* taken from: http://mathworld.wolfram.com/CubicSpline.html
[2 1 ] [D[0]] [3(v[1] - v[0]) ]
: 1 4 1 : :D[1]: :3(v[2] - v[0]) :
: 1 4 1 : : . : = : . :
: ..... : : . : : . :
: 1 4 1: : . : :3(v[n] - v[n-2]):
[ 1 2] [D[n]] [3(v[n] - v[n-1])]
by converting the matrix to upper triangular.
The D[i] are the derivatives at the control points.
*/
//this builds the coefficients of the left matrix
gamma[0] = Vector3.Zero;
gamma[0].X = 1.0f / 2.0f;
gamma[0].Y = 1.0f / 2.0f;
gamma[0].Z = 1.0f / 2.0f;
for (i = 1; i < n; i++)
{
gamma[i] = Vector3.One / ((4 * Vector3.One) - gamma[i - 1]);
}
gamma[n] = Vector3.One / ((2 * Vector3.One) - gamma[n - 1]);
delta[0] = 3 * (v[1] - v[0]) * gamma[0];
for (i = 1; i < n; i++)
{
delta[i] = (3 * (v[i + 1] - v[i - 1]) - delta[i - 1]) * gamma[i];
}
delta[n] = (3 * (v[n] - v[n - 1]) - delta[n - 1]) * gamma[n];
D[n] = delta[n];
for (i = n - 1; i >= 0; i--)
{
D[i] = delta[i] - gamma[i] * D[i + 1];
}
// now compute the coefficients of the cubics
Cubic[] C = new Cubic[n];
for (i = 0; i < n; i++)
{
C[i] = new Cubic(v[i], D[i], 3 * (v[i + 1] - v[i]) - 2 * D[i] - D[i + 1],
2 * (v[i] - v[i + 1]) + D[i] + D[i + 1]);
}
return C;
public Vector3 GetPointOnSpline(float s)And that's it. Now we have a smooth animation of our camera. There are many more ways to calculate the curve, including: hermite curves, b-splines, bezier curves, catmull-rom splines, NURBS(Nonuniform Rational B-Splines) and others. Microsoft also has a sample on creating a camera path that appears to be using hermite curves. But they hide all the details from you, and it's just more interesting to know the math behind it isn't it ;) ?
{
return (((d * s) + c) * s + b) * s + a;
}
Thursday, May 1, 2008
Camera Animation, Part I
Due to the video being such high frequency, the blogger, youtube video compressors always make the video look like crap. Original can be found here:
So today I'll be giving a tutorial/sample on cut-scene animation, more specifically camera animation. This will be a 2 part tutorial, and this one will focus on linear interpolation of camera key frames.
So what are key frames? Key frames are the control points of an animation. They are the main/key points that you specifically define where the camera should be, and everything else in between is interpolated. You can also think of them as an outline of what the animation should look like. Here's a picture to help describe what I'm talking about.

Here, the green line is the path we want to follow, the orange dots are our key frames, and the red dots are the intermediate cameras that we want to generate.
So how do we create these intermediate cameras?
for (int i = 0; i < mKeyFrames.Count - 1; i++)Pretty self explanatory, a basic linear interpolation. XNA is handy in that we can cut out all of that code and just use Vector3.Lerp().
{
for (int j = 0; j < mPathSteps; j++)
{
//We could alternatively use the Vector3.lerp function
//but I wanted to show the math behind performing the linear interpolation
Vector3 diff = mKeyFrames[i + 1].Position - mKeyFrames[i].Position;
diff = Vector3.Multiply(diff, (float)j / (float)(mPathSteps - 1));
Vector3 center = mKeyFrames[i].Position + diff;
diff = mKeyFrames[i + 1].Look - mKeyFrames[i].Look;
diff = Vector3.Multiply(diff, (float)j / (float)(mPathSteps - 1));
Vector3 look = mKeyFrames[i].Look + diff;
diff = (mKeyFrames[i + 1].Up - mKeyFrames[i].Up);
diff = Vector3.Multiply(diff, (float)j / (float)(mPathSteps - 1));
Vector3 up = mKeyFrames[i].Up + diff;
Vector3 r = Vector3.Cross(up, look);
Vector3 u = Vector3.Cross(look, r * -1f);
Camera cam = new Camera();
cam.SetLens(mFOV, mAspect, mNearZ, mFarZ);
cam.Place(center, look, u);
cam.BuildView();
mCameraPath.Add(cam);
}
}
The included demo has a pre defined path that is shown in the video. But you can also create your own path at run-time. Here are the controls:
- 1 - Default camera view
- 2 - Play the camera animation
- 3 - Rewind the camera animation
- 4 - Pause the camera animation
- C - Clear the current key frames
- K - Add the current camera to the key frames list
- B - Build the camera path from the current key frames
- O - Save the current key frames to an XML file
When you start the demo, the predefined path is already loaded, all you have to do is hit '2', and it will play. If you want to make your own path first clear the key frames by pressing 'C', and then navigate to where you want to be along your path and press 'K' to add your key frames. Once you're happy with your path, press 'B' to build the camera animation, and then you can play it by pressing '2'. Normally, I would use winForms or a GUI such as neoforce for the controls, but this adds a lot of clutter.
So there's probably one thing that you might notice about the camera animation, and that is that it's not very smooth. Next time I will introduce cubic interpolation to smooth out the animation.
Subscribe to:
Posts (Atom)